Introduction
The Accounting module is a set of processes that are required to provide company financial information to users. It also provides and analysis support to the business.
Accounts
Under this accounts setting, user will able to setup and view the Chart of Account, Account list, Journals and Ledgers in their Swan’s account.
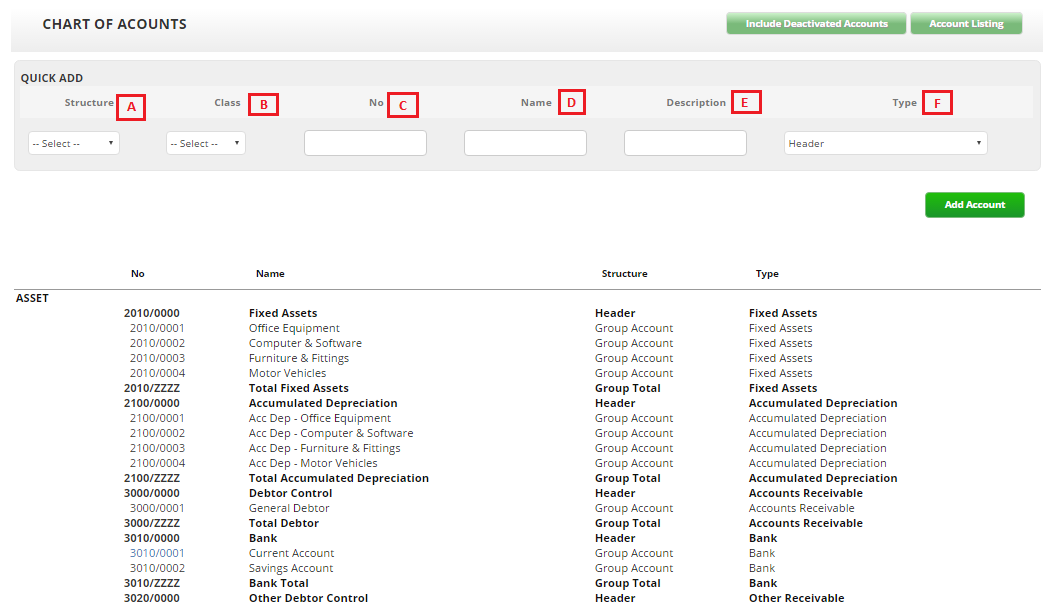
Chart of Account
A Chart of Accounts (COA) is a list of accounts used by an organization. It defines each class of items in which monetary (or equivalent) transactions are recorded. A COA is used as a financial organization tool and serves as a foundation for a company's financial record keeping system.
- This function allows Finance Admin to view the company Chart of Accounts and make quick additions via the Quick Add Account shortcut.
- Before creating the company Opening Balance, Finance Admin has to ensure that the Chart of account follows the company list of accounts.
- The system provides eight types of Chart of Account templates that users can choose from; Default (a standard Chart of account), Open List (an open Chart of account without Header or Sub Header) and Segmented (a Chart of account which has been segmented with Header, Sub-header and Sub-total).
- Quick Add section on Chart of Accounts page allows users to quickly add a new account to the list.
Account Setup
Accounts provide a means for grouping transactions. When you setup your company account in the system, you will select a default accounts list to start with. This list may already have the accounts you need. If not, you can change the list to suit your needs.
- Move your mouse to Accounting >>click on Account List
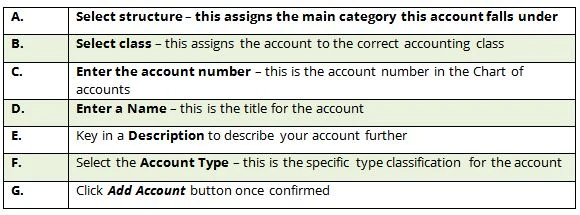
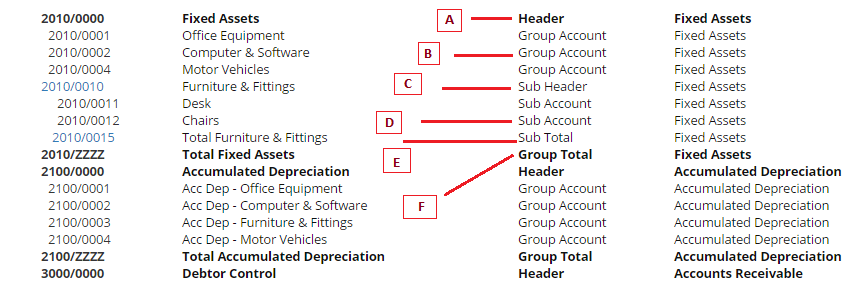
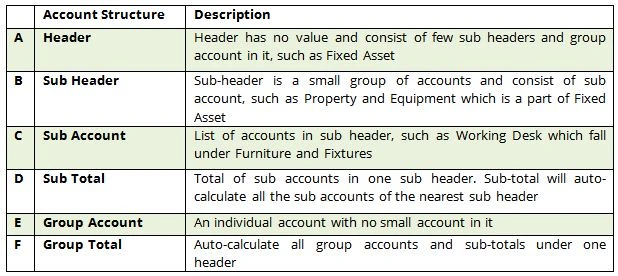
- Account Numbers – Each account is identified using a unique six-digit number. The first digit indicates the account’s classification while the remaining five digits determine its location within the classification. The lower the number, the higher up in the list it appears.
- Account Structure – Your accounts list consist of few structure such as Header, Details
- Accounts (Sub-Account or Group Account). This structure helps you organize your account list. The following table explains in details of structure available in the system, with reference to the figure below.


Account Classification and Types
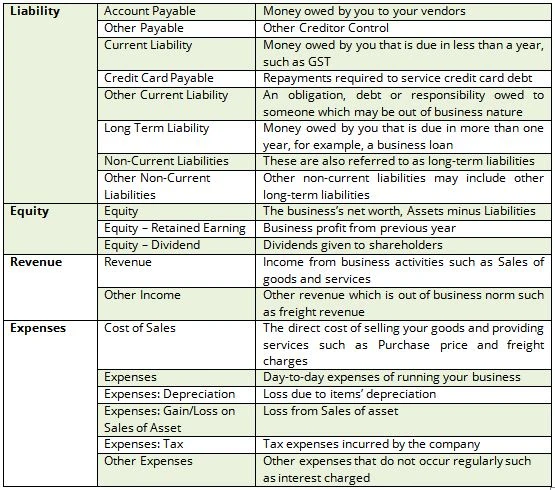
The accounts list groups accounts into five classifications; Asset, Liability, Equity, Revenue and Expenses. Within each account classification, there is at least one account type


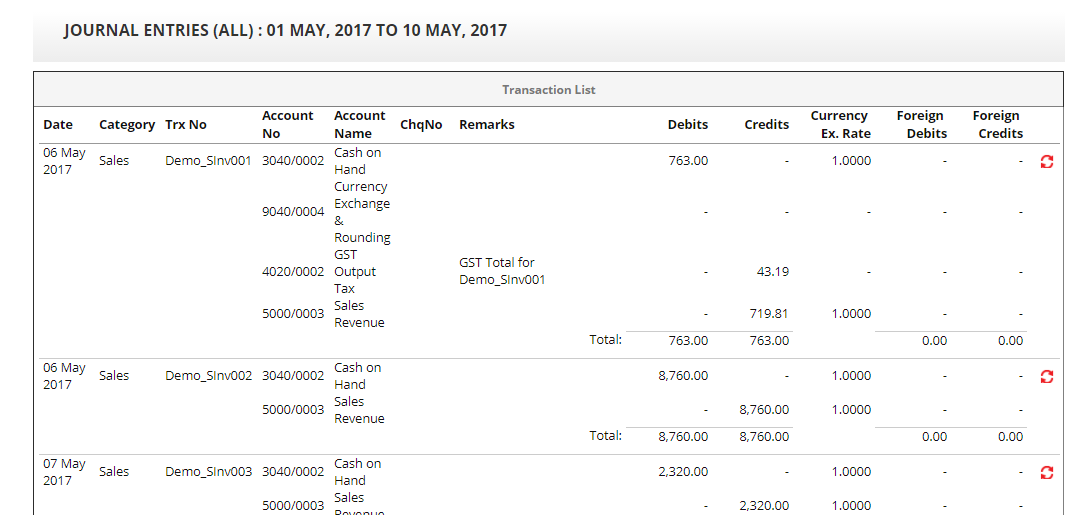
Journals
This function provides Finance Department with a tool to view and make Journals entries.
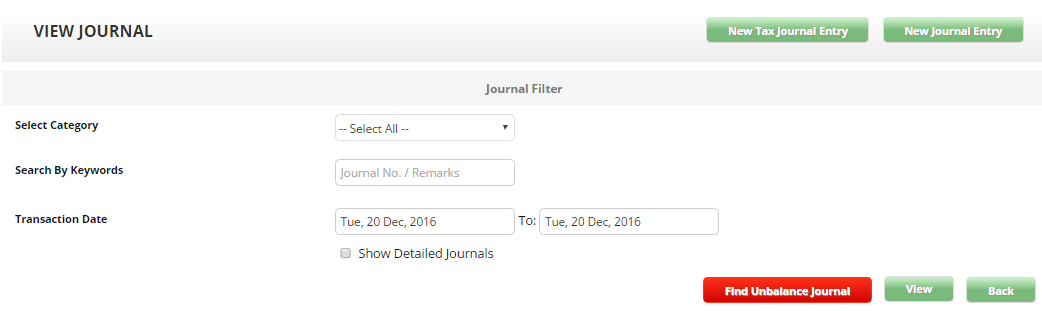
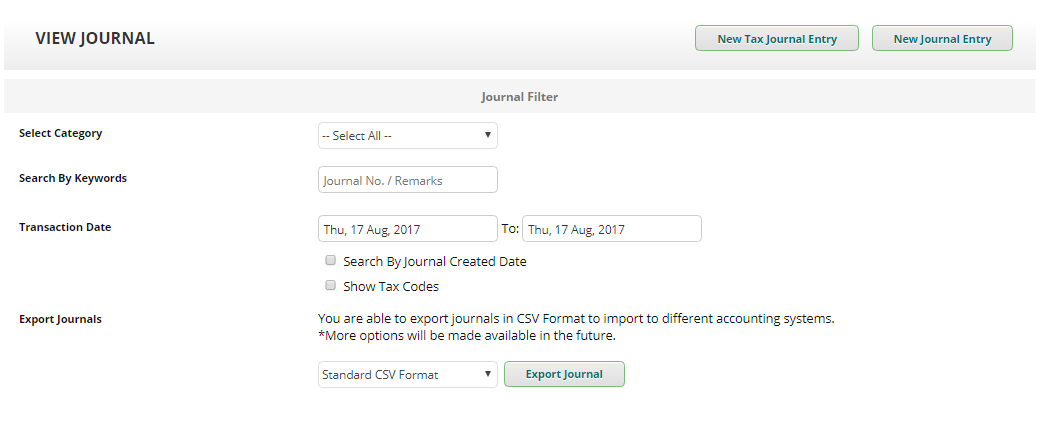
View Journals
- Move your mouse to Accounting >> click on Journals
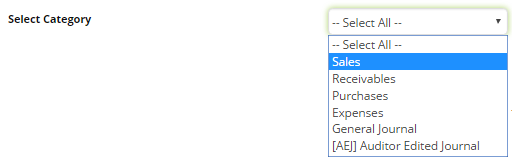
- Select the Journals category to view. Leave it blank to see every category.

- Enter the date range of the transaction you are interested in.
- Click View button.
- A larger date range and all category selection may yield many records. The system will require time to process.

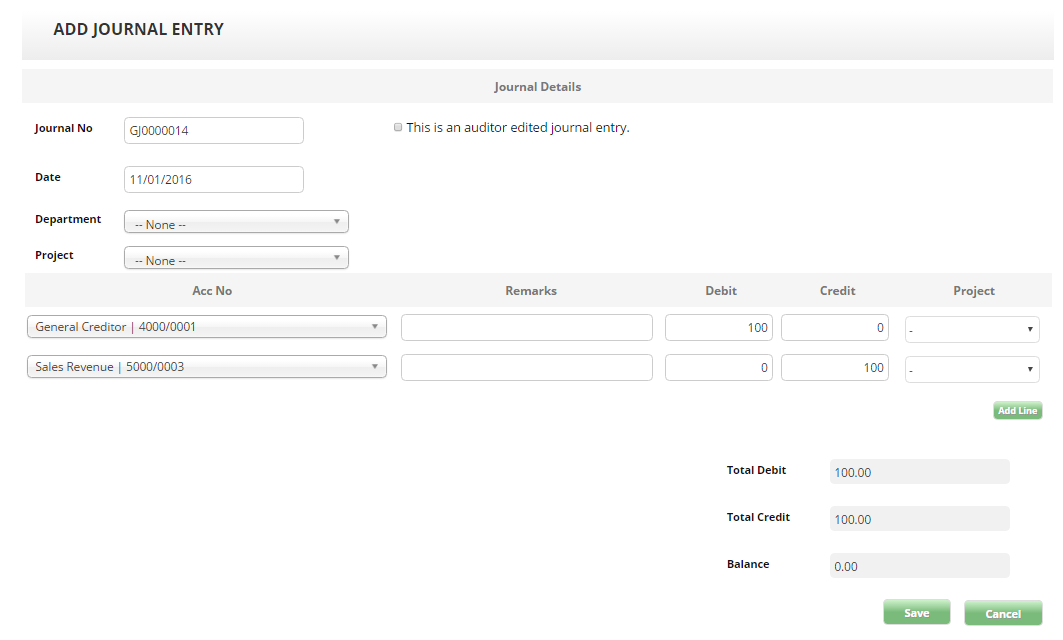
New Journal Entry

- Click New Journals Entry button
- A Journals number is auto-generated for you. Key in an alternate number if necessary
- Check the This is an auditor edited Journals entry if it is done by auditor
- Select a Date for the Journals entry
- Project and Department and are not applicable to Swan
- Select an account for both debit and credit entries from Account No. dropdown list
- Key in respective remarks
- Key in either Debit or Credit value for each account
- Click Add Line to add additional lines for the Journals entry
- The system auto calculated your accounts and ensure the accurate balances
- The Journals entry follows standard Accounting principles. Users must ensure the Debits and Credits are balance, though the system will prompt users if it is not balance
- Auditor Edited Journals Entries are commonly created to make adjustments after closing the accounting books for a period. Since the temporary accounts have already been zeroes out, the system will make necessary adjustments for Auditor Journals Entries. This will ensure the financial statements are accurately reflected
New Tax Journals Entry

- Click New Tax Journals Entry button
- Choose GST Transaction Type: Purchase (Input Tax) or Sales (Output Tax). Tick Tax Inclusive box if the Journals created is tax inclusive value
- A Journals Number is auto-generated for you. Key in an alternate number if necessary.
- Select a Date for the Journals entry
- Project and Department and are not applicable to Swan
- Select an Account for both debit and Credit entries from Account No. dropdown list
- Key in respective remarks
- Key in either Debit or Credit value for each account.
- Select Tax code
- Click Add Line to add additional lines for the Journals entry
- The system auto calculates your accounts and ensures the accurate balances
- The Journals entry follows standard Accounting principles. Users must ensure the debits and credits are balanced, though the system will prompt users if it is not balance
Export Journals
This function allows you to export your journal to excel file
To export the journal entries, you will have to go to Accounting >> View Journals
You can choose to either export all your journals within the selected period or you can filter the journals before exporting them out to excel.

The filter includes:
- Categories such as sales, purchases, general journals, expenses or receivables
- Search via keywords to select specific journal entries, the keywords can be from journal number to remarks
- The transaction date/period
- Optionally you can choose to search by journal creation date or showed the transactions tax codes
Once you have made your selection, click the "Export Journal" button. The file will be saved as CSV and can be view via excel.

The journals that were exported will be the same as the one you viewed in the system

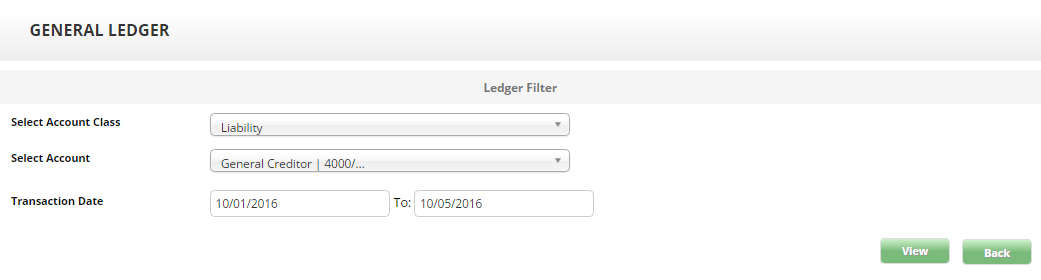
Ledger
This function allows Finance department to access to the general ledger which holds account information that is needed to prepare financial statements.

- Move your mouse to Accounting >> click on Ledgers
- User able to select a particular Account Class or Account Name to view that specific account’s ledger with Beginning Balance, Net Activity and Ending Balance.
- Enter the transaction date and click View button
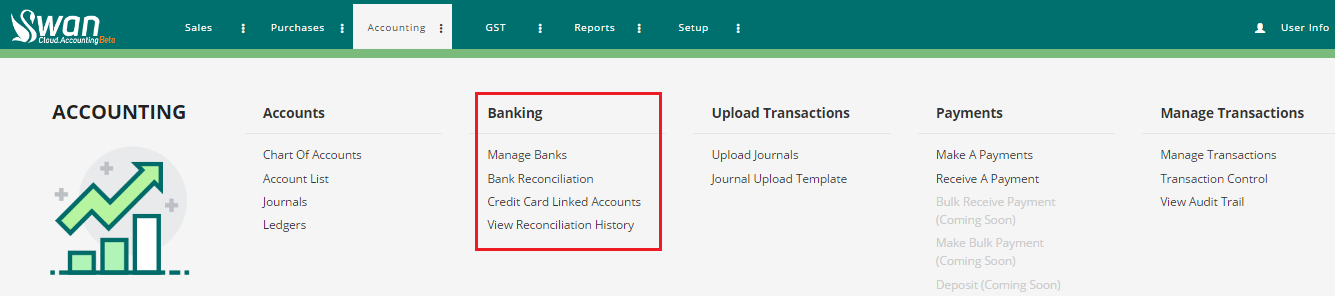
Banking
Banking features record your bank and cash transactions and keep on top of your finances. You can record the money that goes in and out of bank accounts and credit card accounts whilst managing money that you deposit in a batch, such as customer payments made by Cash, Cheque or Credit Card or record cash payments and purchases. You can also reconcile transactions shown on your bank statement with the information you have recorded in the system to keep your records up-to-date.

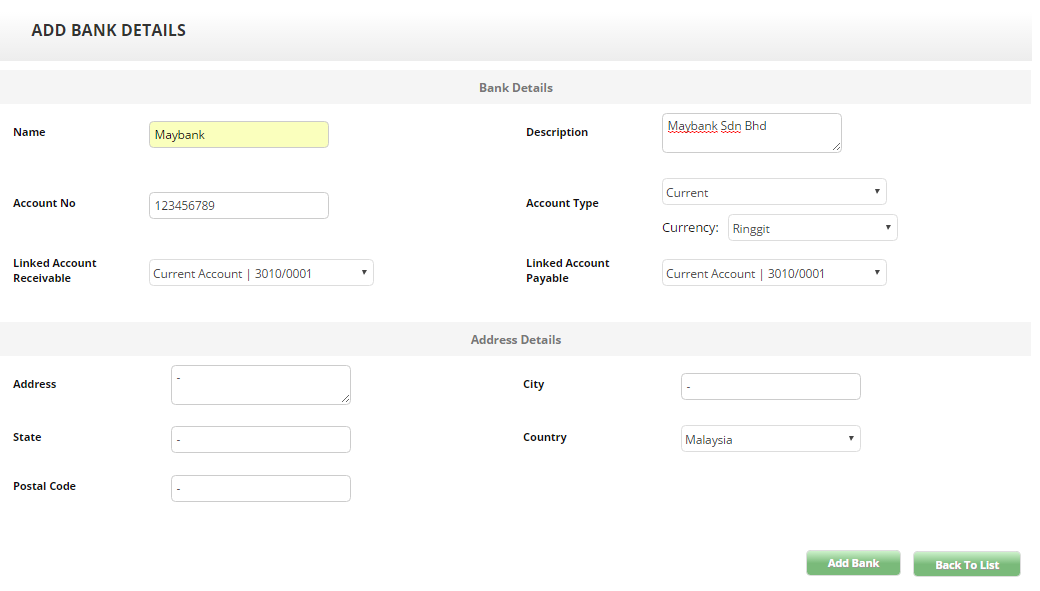
Manage Banks (Add new bank account)
Adding bank is essential as it links your bank account to your company’s Accounting Books. By choosing the bank account in any transaction, the system will automatically add or subtract the figure from the accounting books.

- Move your mouse to Accounting >> Banking >> Manage Banks
- Click Add New Bank button
- Key in the bank Account Name, Account Number, description, and details
- Select a Link Account Receivable account where any payment received by this bank will be debited.
- Select a Link Account Payable account where any payment paid by this bank will be credited.
- Key in the bank address details for record purposes.
| Important | For a foreign bank account, the linked account chosen MUST HAVE the SAME CURRENCY as the bank. The account’s currency can be determined on the account details in Setup >> Chart of Account << Click on account number |
|---|
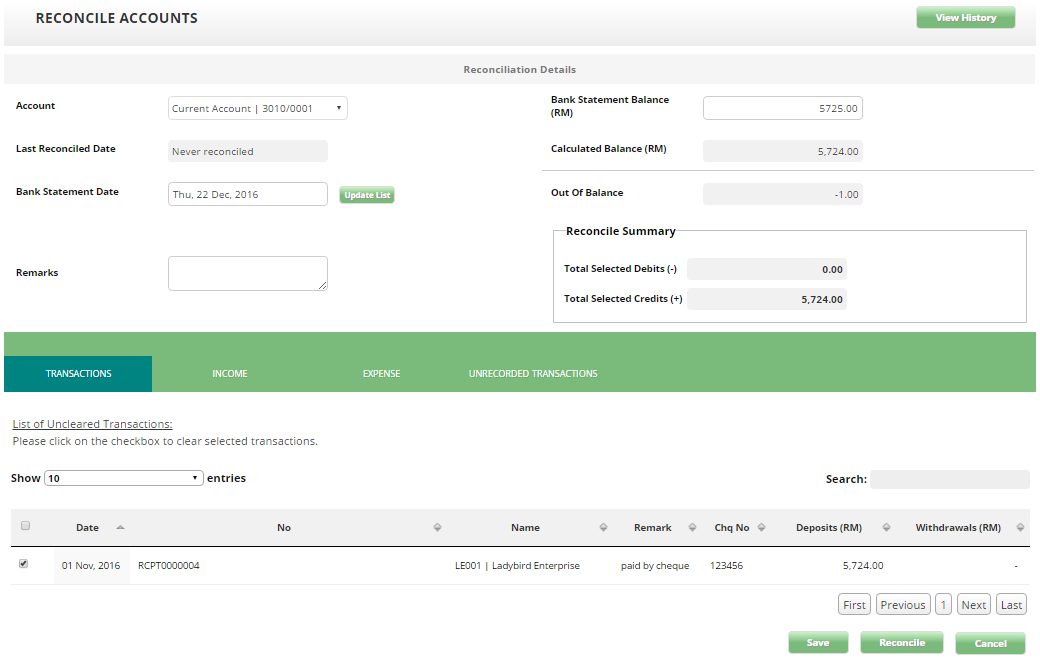
Bank Reconciliation
This function allows Finance Admin to perform reconciliation activities against banks statements.

To reconcile accounts, move your mouse to Accounting >> click on Bank Reconciliation
- Select the bank account you wish to reconcile.
- Enter the bank statement balance and remark for reference.
- Select the bank statement date. The system will auto-calculate the difference between the bank statement and the selected bank account balance.
- A list of unclear transactions will be presented. Select any or all transactions of which you wish to reconcile against the bank account. You may also enter any income or expenditure adjustment such as bank interest.
- Select income tab.
- Select appropriate credit account from the dropdown list.
- Enter description and amount.
- Select Expense tab and appropriate debit account from the dropdown list. Enter a description for this action.
- Enter the amount.
- In certain cases such as during opening balances, there may exist unrecorded transactions such as unclaimed checks or un-deposited payments from previous periods. In order to reconcile these transactions, you will need to enter the information in the Unrecorded Transactions Section. The system will bring forward the transactions onto the next reconciliation process.
- User can save a reconciliation work with multiple bank statement pages if more time is required to perform reconciliations.
- Saved reconciliation report can be recalled by clicking on the "Recall" button on the top right of the Reconciliation view.
- The system provides reconciliation history which allows Finance Admin to view or reverse the reconciliation. To reverse the account reconciliation at certain period, you will have to reverse the latest reconciliation.
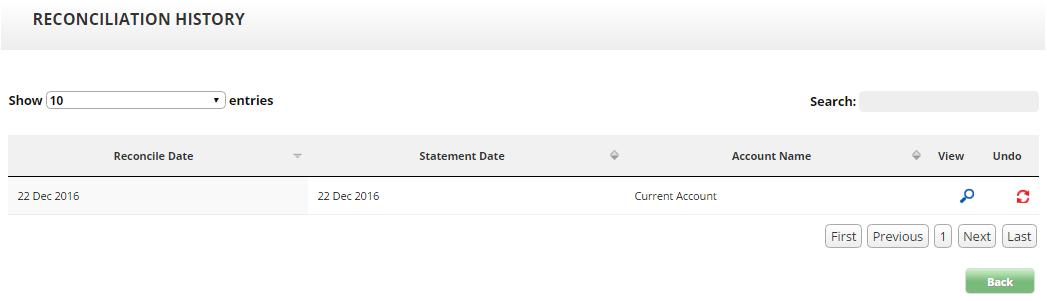
Reconciliation History
This feature provides Finance department a reconciliation history report for the company. The system allows Finance admin to view or reverse the reconciliation.

| Tips |
In order for you to regenerate the reconcile account, click Undo button to delete current Reconciliation History record |
|---|
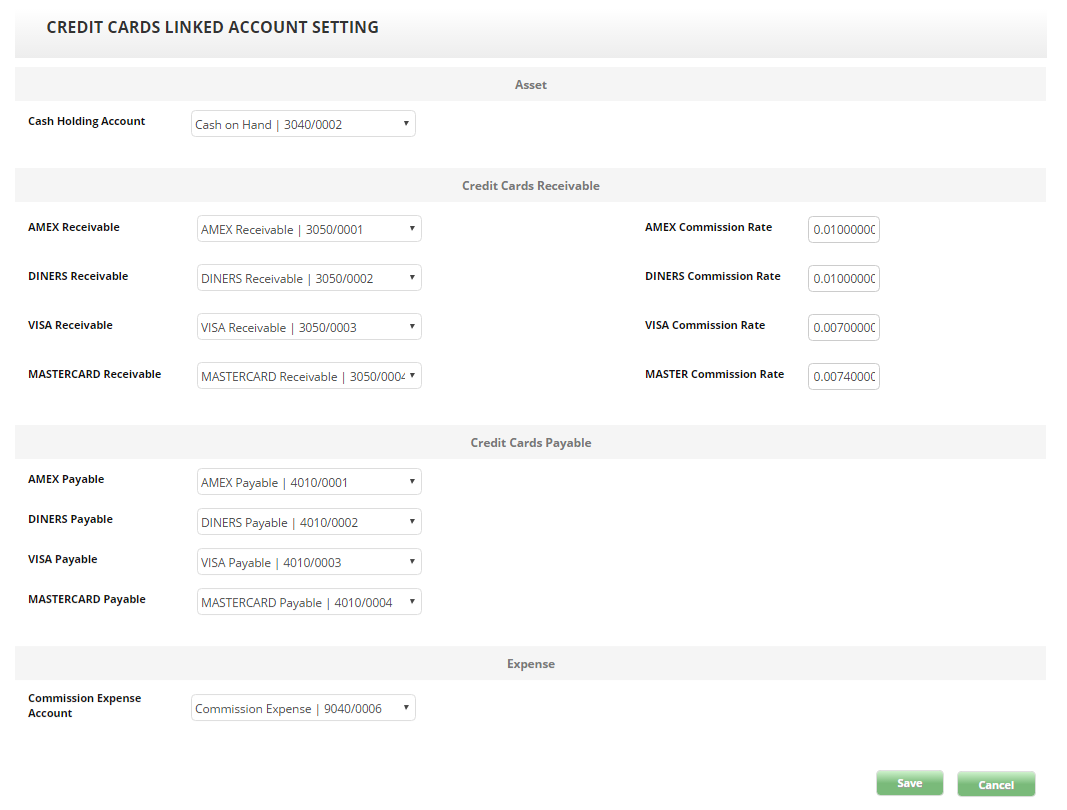
Credit Card Linked Accounts
The system provides user with default Credit Card linked accounts setup for your Swan account. However, user may still change this setup according to own preferences.

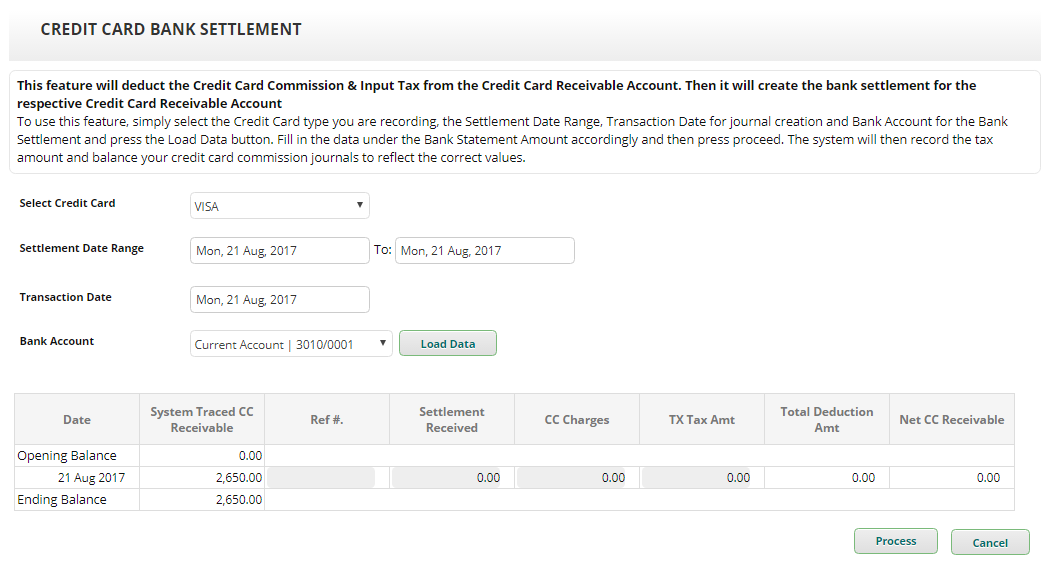
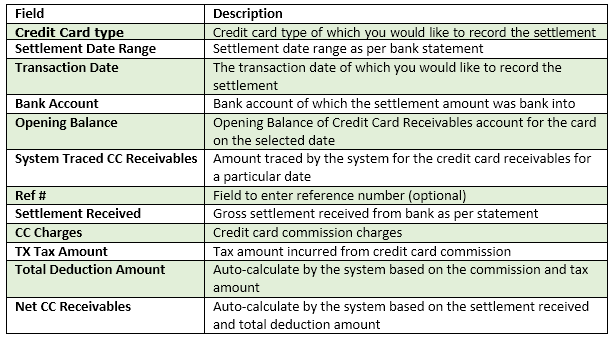
Credit card settlement
Credit card settlement feature allow you to reconcile your credit card statement received from bank into Swan.
Credit card settlement will deduct Credit Card Commission and Input Tax from the Credit Card Receivable Account. It will then create bank settlement from the respective Credit Card Receivables account. To access this page, mouse over to Accounting>> Banking >> click on Credit Card Settlement.
Steps for credit card settlements are:
- Mouse over to Accounting >> Banking >> click on Credit Card Settlement
- Select the Credit Card type you are recording
- Select Date Range
- Select Bank Account of which the amount of settlement was bank into
- Click Load Data

NOTE: The system WILL NOT auto-calculate your commission and input tax on commission. The commission and input tax on commission amount will follow the amount entered.
Payment
Another process that you will need to perform from time to time is making payments and receiving payments. Examples of such transactions include recording utility bills, staff salaries and other ad-hoc or miscellaneous payments.
Swan has built specific features for both of these transactions to simplify this process.
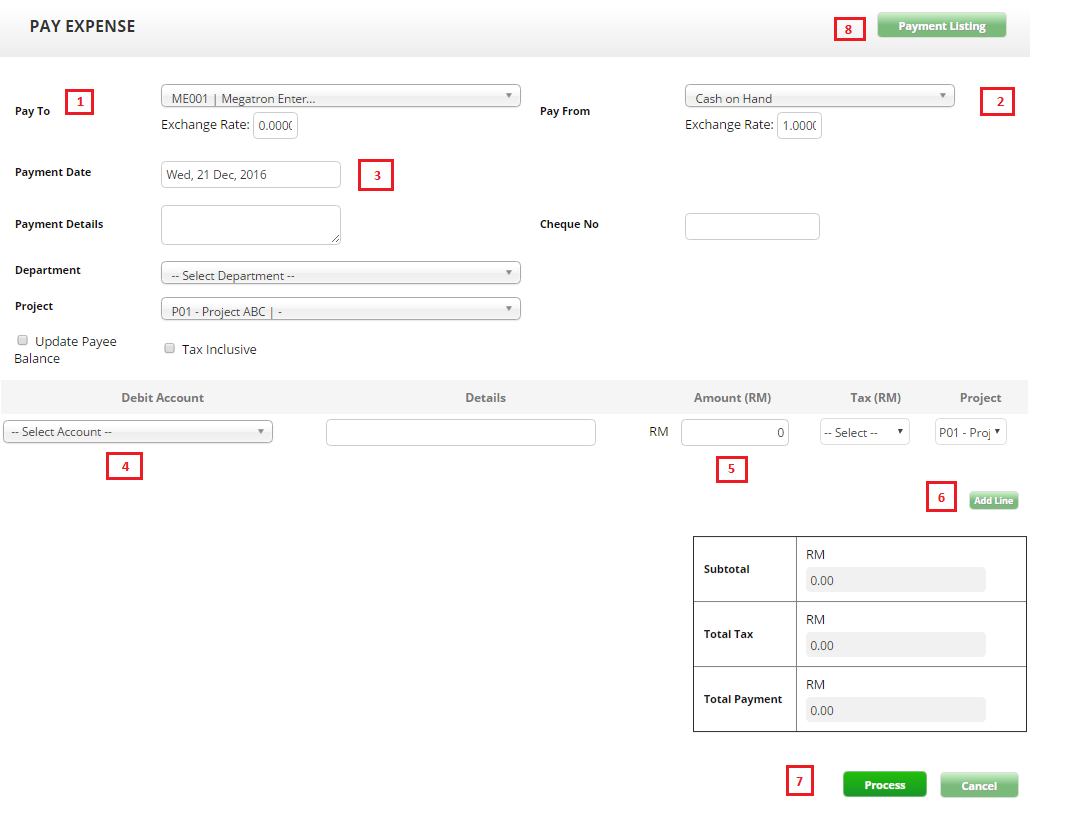
Make A Payment
The expenses function is use for miscellaneous payment to customer or vendor.
It is advisable that you create a contact record for the entity that you are about to make payment to. Follow the instructions on the Contacts and Item List section for instructions on how to create a new contact record.
Recording a payment and selecting a Tax code will result in an INPUT TAX movement in your GST submission.
Move your mouse to Accounting >> Banking >> click on Make A Payment

- Select Payee from the dropdown list and choose account of which the payment will be made from.
- Check the Update Payee Balance if this payment will affect vendor’s balance. It is advisable to check this only when required as the systems will automatically handles balances based on keyed-in transactions.
- Enter payment details and select an account of which the payment will be debited to.
- Select project/department if required
- Enter details if necessary and the amount to be paid.
- Once the payment is posted, the system will auto-generate payment voucher.
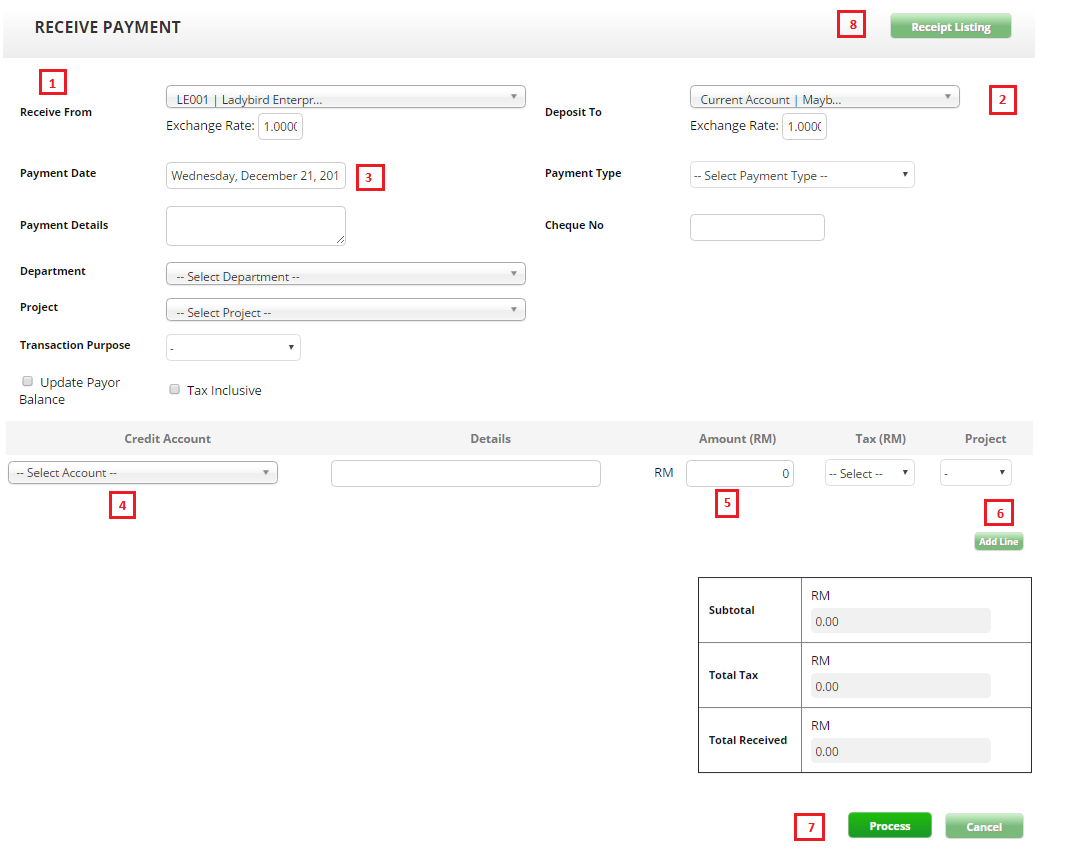
Receive A Payment
The receive payment function is use for miscellaneous payment from customer or vendor.
Receiving payments and selecting a Tax code will result in an OUTPUT TAX movement in your GST Submission.
Move your mouse to Accounting >> Banking >> click on Receive A Payment

- Select Payor from the dropdown list
- Choose Account of which the payment will be debited to
- Enter Payment Date
- Select a Misc Account of which the payment will be credited from
- Enter Amount to be received
- Click Add Line to add new line entry if you have more than one Misc Account to credit from
- Click Process to proceed with receive payment.
- Payment receipt will auto-generate by the system in Receipt Listing
- The system allows receiving payment for future dates. This is to ensure accurate record.
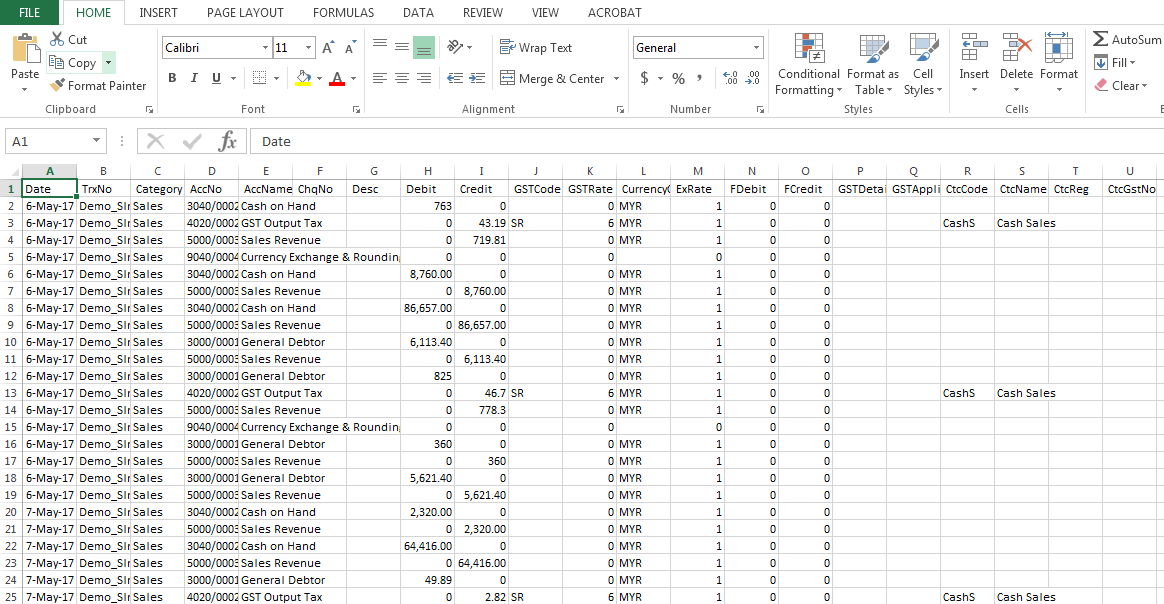
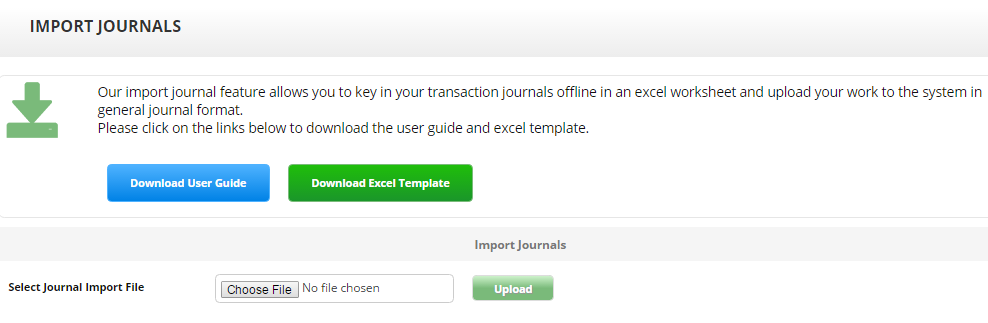
Import Journals
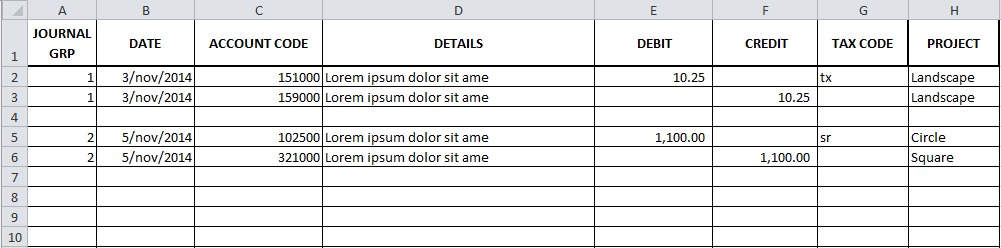
Our import Journals feature allows you to key in your transaction Journals offline in an excel worksheet and upload your work to the system in general Journals format.
Journal Upload Template
To download the user guide and excel template, you may click button as per shown below:

You can import your Journals from a Microsoft Excel Worksheet (.xlsx) file. The file should contain columns with its specific format for
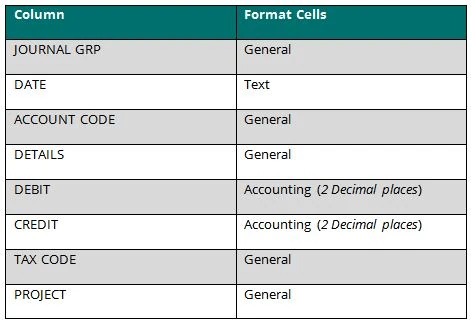

Upload Journal
There is no limit on number of rows in a file. See a sample of how to format your file for importing. Mouse over to Accounting >> Uploads Transactions >> Upload Journal. Then select your exported Journals file and click "Upload"


Notes:
- Group your Journals entry by JOURNALS GRP number.
- Separate each group entry by having a blank row.
- DATE is in string format. It takes the first 3-string characters of the month and ‘/’ or ‘–’ as separator a. Month: Jan, Feb, Mar, Apr, May, Jun, Jul, Aug, Sep, Oct, Nov, Dec b. Example: 01/Jan/2015 or 01-Jan-2015 *Date will be set to current date if the date format criteria is not met.
- ACCOUNT CODE as per account list setup. If your Journals contain an old account code, please convert it first to match the new account code set up in the system
- Enter Journals details in DETAILS column
- Enter debit and credit amounts in their respective DEBIT & CREDIT columns
- Enter TAX CODE as per recommended Tax Codes for Goods & Services Tax prepared by Royal Malaysian Customs Department (pre-loaded in the system). Example: SR, TX, etc.
- Setup all the projects in the system and tag them accordingly by project code or project name under PROJECT
Manage Transactions
This chapter explains how to manage your transactions. This includes transactions that have been posted, payment that had been received or paid.
Managing transactions feature is a corrective measure available in the system to ensure the transactions recorded are accurate. Transactions are created when you recorded entries such as Sales, Invoices, Purchase Orders and Received Inventory. Only users with Finance Admin role can changed, deleted or reversed transactions whether it is saved or posted. If you are part way through entering a transaction, you can erase it and start again. Sometimes, however, you may need to make changes or delete transactions that have already been recorded. The system provides few methods as resolutions to these situations
Saved or Un-posted Transactions
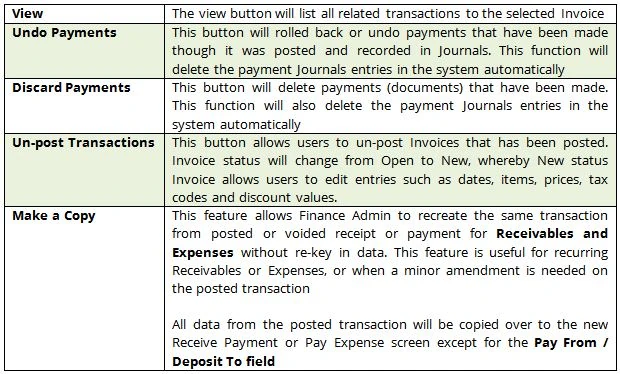
- Un-post transactions refer to documents or transactions that has been created and saved but not yet been posted.
- To make changes on the document, click on Alter icon.
- Saved document is not a valid document and no Journals are created.
Posted Transactions Posted transactions are transactions that have been recorded and Journals entry has been created. Posted transactions cannot be edited except for Dates, Items, prices, Department, Project, Sales Person and Remarks fields. No changes are allowed on vendor/customer and invoice number.
Corrections to Transactions


- Undo transactions will auto delete related financial Journals
- Un-posted Invoices are editable. This feature can be used to correct mistakes without the need to void a financial transaction

- Manage transactions feature only allows Finance Admin to roll back transactions in Sales and Purchases and Undo Payments in Receivables or Expenses.
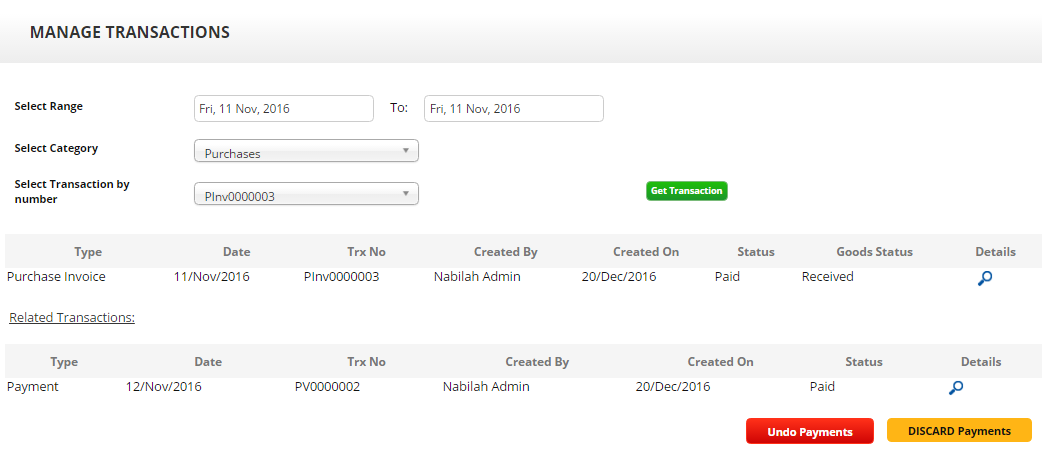
- Move your mouse to Accounting >> click on Manage Transactions
- Select Category of the document you wish to roll-back; Purchase, Sales, Receivables & Expenses
- Select Transaction number
- Click Get Transaction to retrieve transaction record
- Click view to view transaction details
- Click Un-post Transaction to reverse transaction status
- Click Undo Payments to reverse/void Receipt or Payment Voucher
- Click copy icon in Details column to make of a copy of transaction details. This feature is available for Receivables and Expenses transactions only
- The following table explain the function of button available on manage transactions page.

| Note: | Though the Journals have been deleted, audit trail will capture these corrective actions for audit purposes. |
|---|
Transaction Control
This function allows Finance Admin to control transaction which has been done and only allows transactions within the 'Allowable Transaction Period' to be processed by the system. Any transactions outside of the allowable period will generate an error message.
To block unwanted transactions, move your mouse to Accounting >> Manage Transactions >> click on Transaction Control
Set the allowable period for data entry by entering the 'Date From' and 'Date To' fields and click on the 'Activate' checkbox
This feature can be turned ‘On’ and ‘Off’ by the Finance Administrator only
This feature is recommended to be used to control data entry during a GST reporting period.
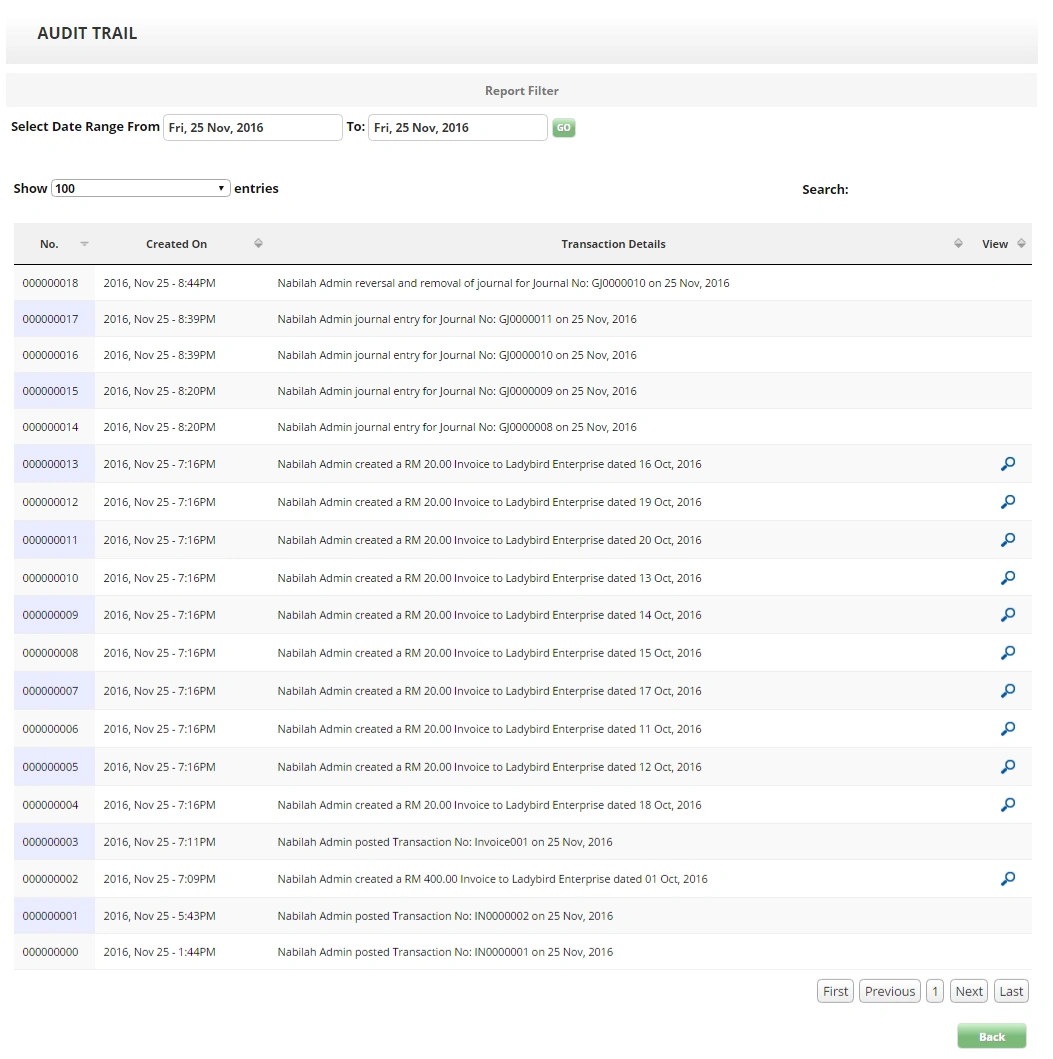
Audit Trail
Audit Trail is a built in governance to ensure all transactions, edits, updates and other changes are tracked by the system.
Bulk Transactions
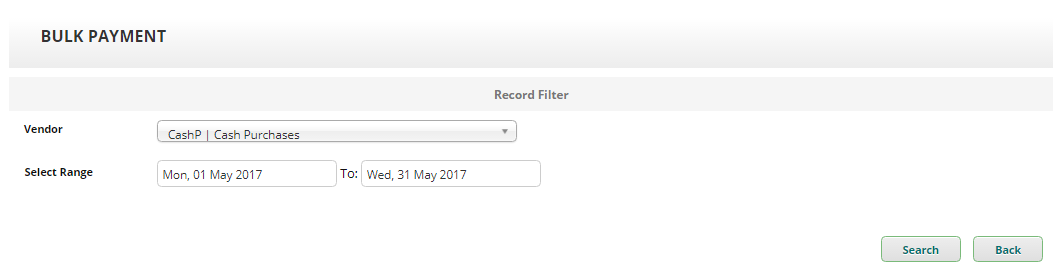
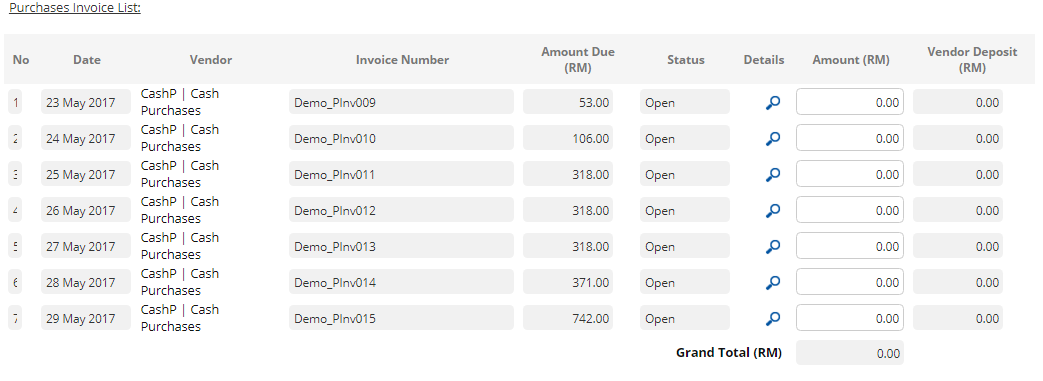
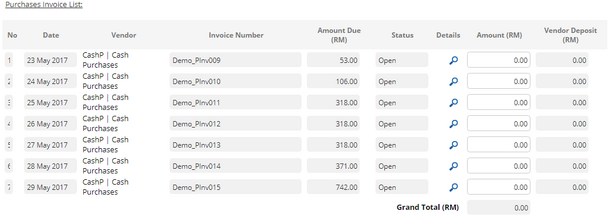
Make Bulk Payment
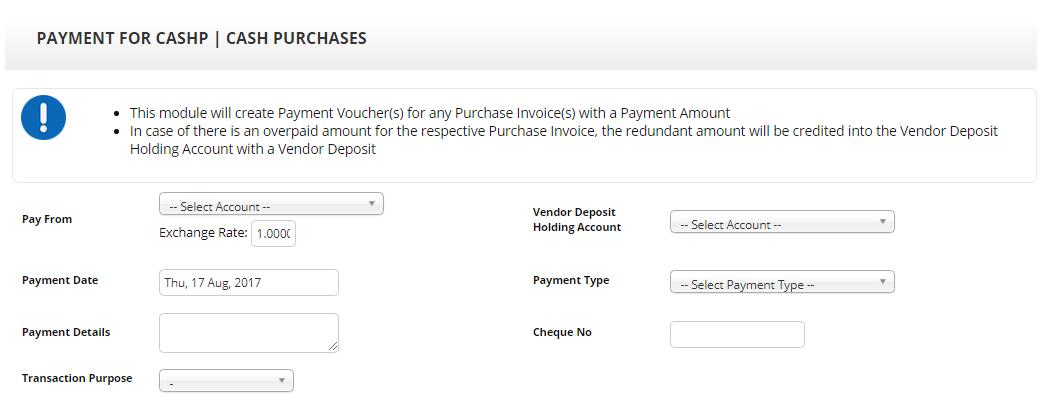
This module will create Payment Vouchers (multiple) for any Purchase Invoices with a Payment Amount.
To perform bulk payment, go to Accounting >> click on Create Bulk Payment

1.PNG)
Steps:
- Enter your Vendor
- Select the Date Range
- Click on Search button to continue

Payment Voucher will auto-generate by the system in Payment Voucher Listing.
To view, go to Purchases >> Click on View Payment Voucher


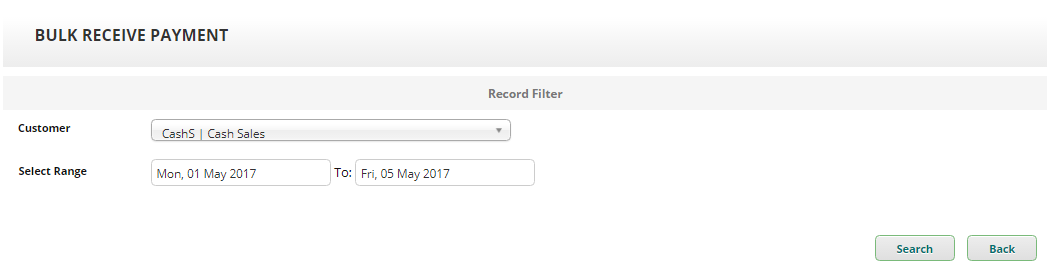
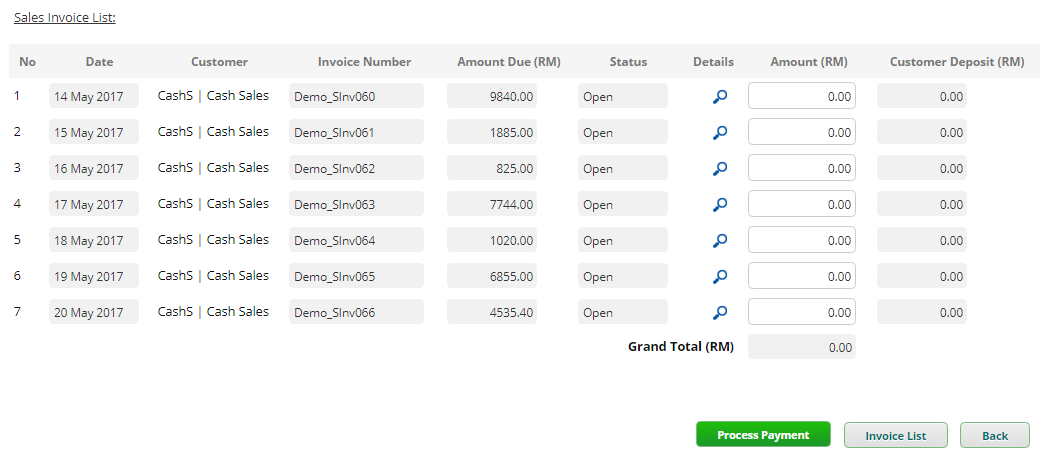
Bulk Receive Payment
This module will create Receipts for any Sales Invoices with a Payment Amount (open status).
To perform receive bulk payment, go to Accounting >> click on Create Bulk Receive Payment

Steps:
- Enter your Customer
- Select the Date Range
- Click on Search button to continue


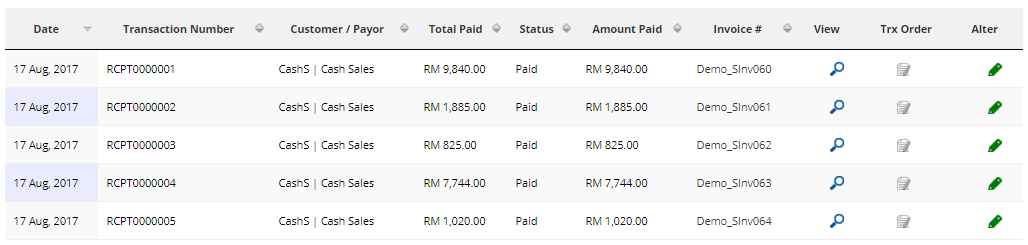
Receipts will auto-generate by the system in Receipt List.
To view, go to Sales >> Click on View Sales Receipt

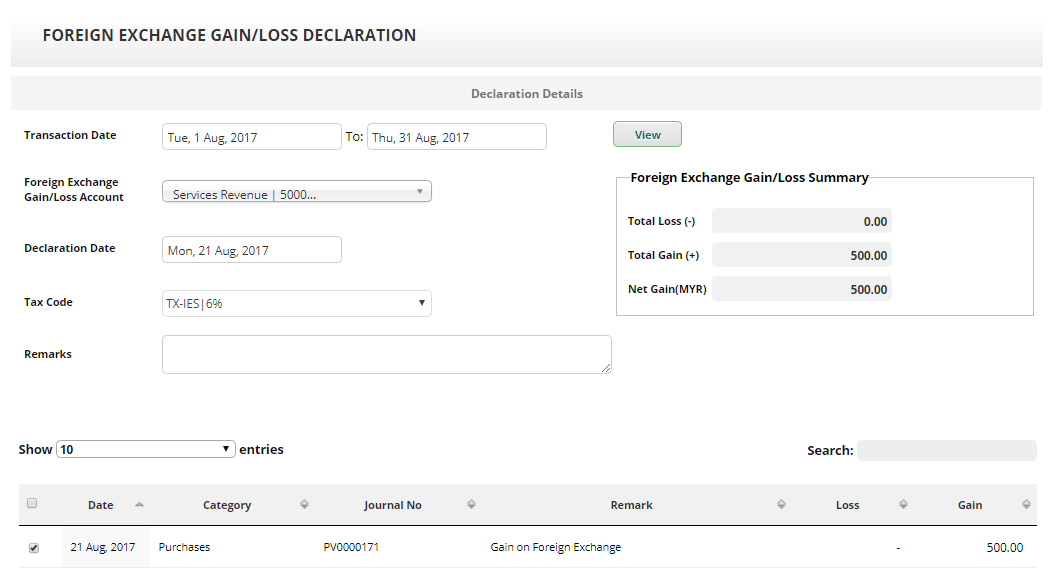
Foreign Exchange Gain/Loss Declaration
This function allows you to declare your foreign exchange gain and loss for other currencies
To make the declaration, you will need to go to Accounting >> Others >> Foreign Exchange Gain/Loss Declaration
- Select the transactions date
- Select the Foreign Exchange Gain/Loss Account. You will need to create your own account as the system do not provide any default account for this purpose
- Enter your declaration date and select the tax code, if applicable
- Enter transactions remarks
- Click View
- Tick the transactions that you would like to declare
- Once you have selected the transactions, click process
- System will then generate general journal to record this declaration
